Testing II
In this lecture we'll be looking at advanced testing concepts, amongst others to ensure our tests are not only wholesome, but also pertinent.
Mutation Testing
- A great deal of this course has been about tools and practices that can be applied to uphold code quality:
- Checkstyle
- Linters
- Documentation
- Testing
- Build Systems
- Continuous Integration
- At heart, what the above have in common, is to provide some guarantees your code is maintainable on the long run. They altogether ensure a modicum of quality in your application's code.
- However, there's one part of your codebase we've been pretty ignorant about: The quality of your tests!
Is there any metric, providing insight on test quality ?
Code coverage. A coverage report, as e.g. generated by the jacoco plugin reveals which fraction of the code has been tested. Low coverage indicates insufficient tests. However the opposite is not necessarily true: High coverage is no reliable guarantee for quality tests.
In the following you'll learn about a software development practice, to reliably assess and improve test quality: Mutation testing.
Illustration : Zombie tests
Bad test are like zombies:
- Do not serve any purpose: They do not provide any insight on potential issues in the code.
- Consume resources: They slow down the build process.
- Spawn quickly: They are easily created and tend to multiply fast, by coverage- and copy-paste-focused software plumbers, and vibe-coders who don't understand their own code.
Example of a zombie test:
@Test
public void isPrimeTest() {
  // Calls production code, but does not assert anything.
  PrimeChecker.isPrime(10);
}
- You want to have a few zombie tests as possible in your codebase.
- But how do you find zombie tests ?
- Searching tests yourself might be time-consuming.
- Zombie tests are not always as obvious to find as the case above.
- Removing them might still damage coverage, so you might feel incentivized to keep them.
Fighting zombies with mutants
- A simple introductory thought:
- If your tests are good, they will identify bugs in your program.
- If your tests are not good, they will fail to identify bugs in your program.
- If we were to artificially add a bugs to the production code...
- ... and no test fails: We seem to have at least one zombie test. (Namely, every tests that covers the line we changed.)
- ... and at least one test fails: We cannot conclude there is a zombie.
Mutation testing formalization
How could we formalize the process illustrated above ?

- Test our codebase the classic way
- Modify our codebase (mutation)
- Run tests again
- Assess whether there are zombies
What do we actually test here ?
Mutation testing does not tell us something about the quality of the production code, but about the quality of the tests ! Mutation testing means "testing your tests".
Mutation example
- Consider the production code containing a function:
And have the following test:
public static int countPrimeNumbersBelow(int limitExcluded) { int primesFound = 0; for (int i = 2; i < 10; i++) { if (PrimeChecker.isPrime(i)) primesFound++; } return primesFound; } public static boolean isPrime(int numberToTest) { for (int i = 2; i <= Math.sqrt(numberToTest); i++) { if (numberToTest % i == 0) { return false; } } return true; } - We're modifying our codebase: Introducing a "negated conditional" mutation, i.e. a variant of our original code:
- We run our tests again: All tests still pass.
- We compare the test results, and there find, there is no change in test results.
What do we take from that ?
We have a zombie test! The test we have is insensitive to a severe programming mistake. A zombie test exists, consumes resources, shows a green success bar, contributes to coverage, but does not reliably ensure code quality.
Creating an army of mutants
- The next logical step is not to test just one mutation, but to create mutants excessively.
- For each mutant, we define:
- If no test failed after introducing the code mutation: The mutant survived, there's a zombie!
- If at least one test failed after introducing the code mutation: The mutant was killed, no zombie found by this mutation.
- Mutations of the original code, are created using a set of mutation rules:
- "Negated conditional": introduce a
!sign in front of a boolean expression. - "Void method call": Remove call to a method with return type
void. - "Increments": Replace a
++by--; - and many more...
- "Negated conditional": introduce a
Wait, all these make no sense. They will just break my program !
Exactly ! All of these changes are supposed to break the program. We want to make changes that reliably break a program. Assuming our tests are good, they must detect the problem.
Mutation coverage
- The results from combined mutants itself are a form of coverage insight:
- Mutations we were able to identify with our tests: Good. Green line in our code.
- Mutations we were not able to identify with our tests: Bad. Red line in our code.
- As such we can use the success ratio (fraction of all mutations that we identified) as mutation coverage report.
- So at the end of the day we have two coverages:
- Traditional test coverage: How many lines of total code are covered by at least one test.
- Mutation test coverage: How many mutations of all can be identified by at least one test.
Low traditional coverage causes low mutation test coverage.
Low traditional coverage hinders mutation testing. Lines that are not covered in the first place cannot possibly be covered by a mutation test.
Pitest
Pitest, or PIT is a program to:
- Automatically generate mutations
- Automatically compare test results
- Automatically produce a mutation coverage report.
Why this one
- Pitest is very easy to integrate, as IDE and maven plugin.
- Pitest is rocket fast:
- Does not mutate what is not traditionally covered.
- Creates mutants by directly modifying the bytecode, no need to compile mutants.
- Pitest has a long list of default mutators:
- CONDITIONALS_BOUNDARY
- EMPTY_RETURNS
- FALSE_RETURNS
- INCREMENTS
- INVERT_NEGS
- MATH
- NEGATE_CONDITIONALS
- NULL_RETURNS
- PRIMITIVE_RETURNS
- TRUE_RETURNS
- VOID_METHOD_CALLS
Maven integration
- Junit 5 comes with its own testing engine. To enable PIT support, an additional dependency is needed:
- The below
pom.xmlsnippet adds pitest as maven plugin:<!-- Both Surefire integration tests and PIT are bound to the verify phase. We want to run integration tests before PIT, because integration tests are faster, and we do not want to run PIT if there are integration failures. To overcome, we place PIT after surefire in the pom configuration file.--> <!-- HTML report available at: target/pit-reports/index.html --> <plugin> <groupId>org.pitest</groupId> <artifactId>pitest-maven</artifactId> <version>1.17.1</version> <configuration> <mutationThreshold>65</mutationThreshold> </configuration> <!-- Mutation tests are expensive (slow), and there's no point in executing them if common tests fail. Therefore we execute them later, in the verify phase.--> <executions> <execution> <id>mutation-tests</id> <goals> <goal>mutationCoverage</goal> </goals> <phase>verify</phase> </execution> </executions> </plugin> - Pitest is linked to the
verifyphase of default lifecycle:- Launch with:
mvn clean verify - Can also be launched individually (without lifecycle execution):
mvn org.pitest:pitest-maven:mutationCoverage
- Launch with:
Pitest report
- Mutation coverage report is available in
targetdirectory:target/pit-reports/index.html- Can be picked up by CI runner ;)
- The report has two sections:
- Overall coverage breakdown:
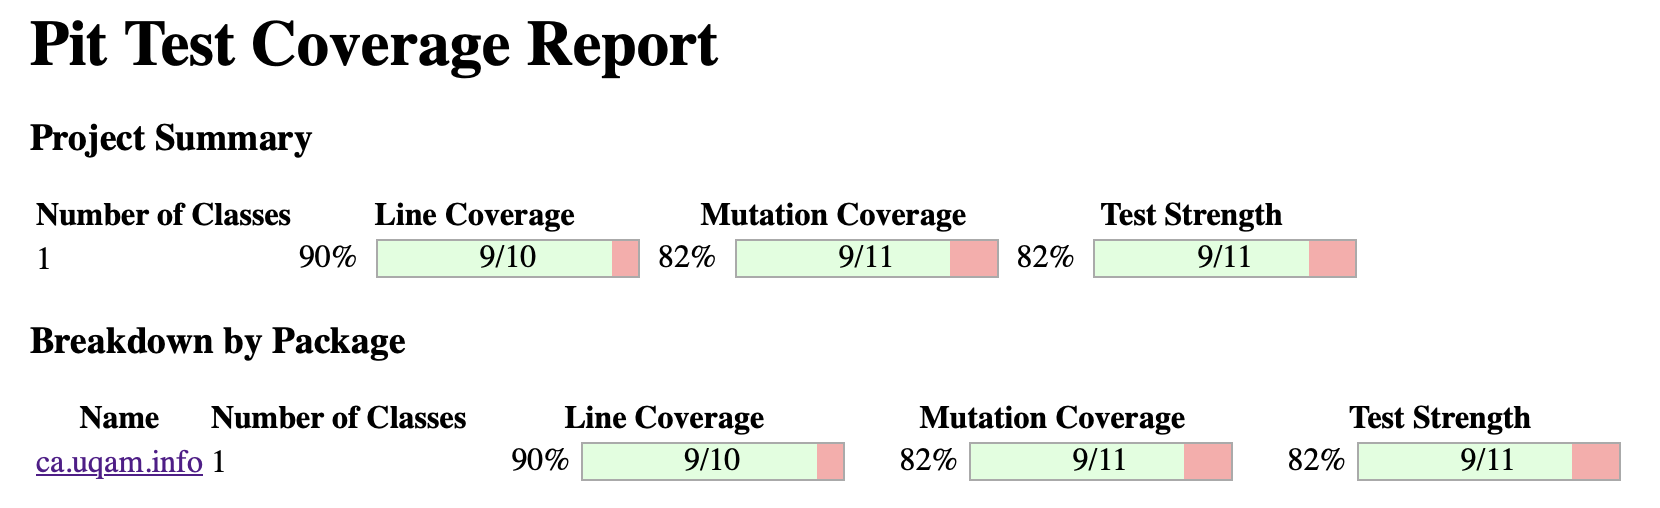
- Traditional test coverage per package.
- Mutation test coverage per package.
- Per class mutation test coverage and details:
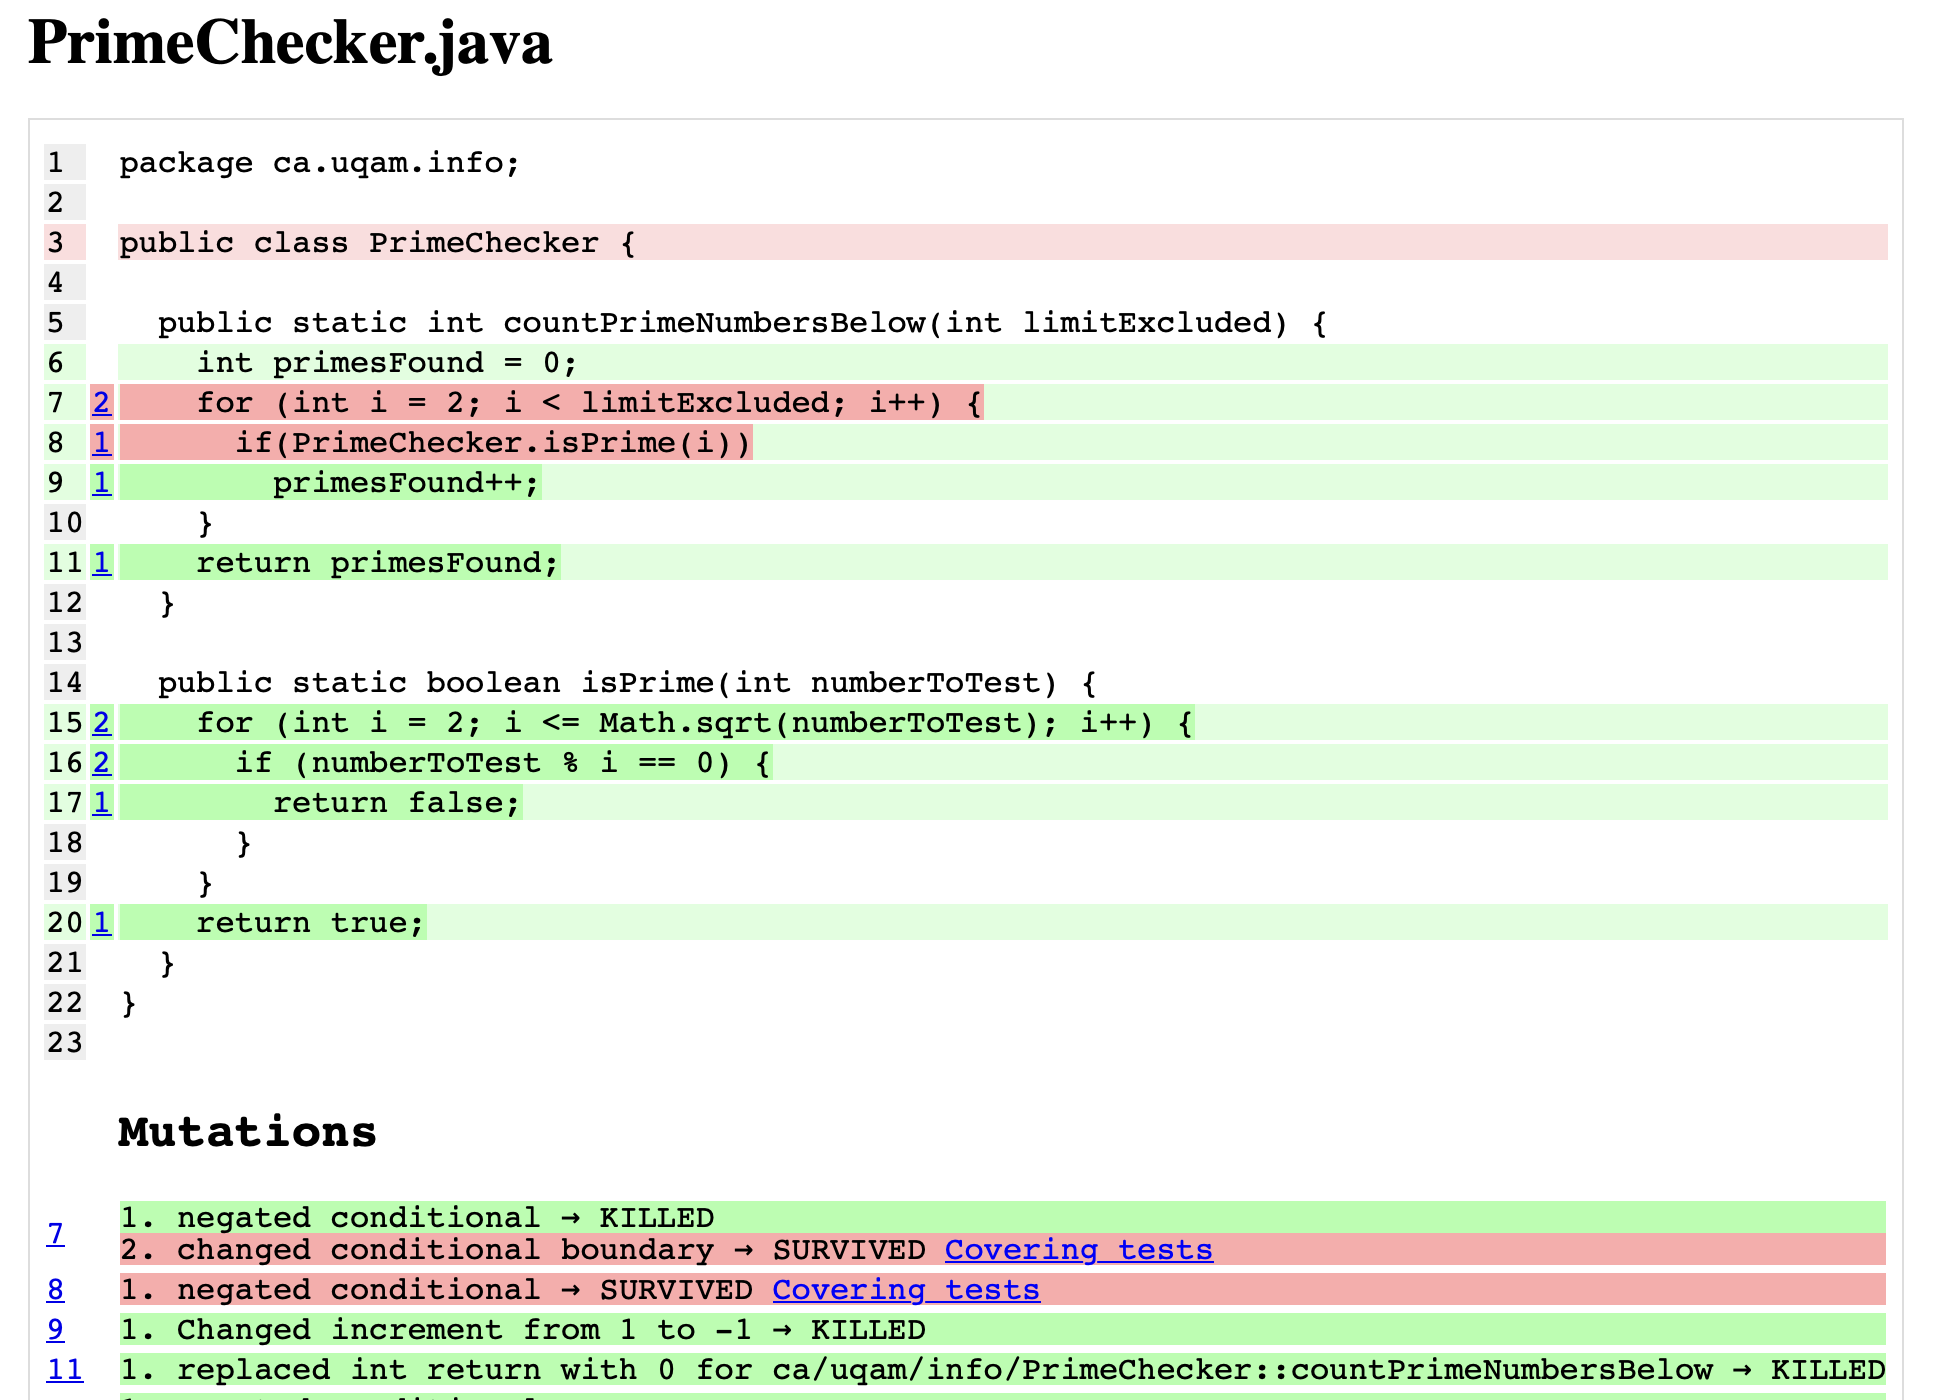
- Green: all mutants killed. No sign of zombie tests.
- Red: at least one mutant survived. You have at least one zombie test.
- Number on side: Mutant details.
- Overall coverage breakdown:
I have zombies, what now?
- Revise the zombies! Revisit your tests and make sure the mutant survivors are killed.
I have 100% line coverage, and 100% mutation coverage. Does that mean I have no bugs ?
No, it is impossible to prove absence of bugs with testing. Nonetheless, your tests are robust against mutants, and you've tested all your code. You are reasonably safe.
Integration Tests
In the first lecture on testing, we've already learned about integration tests, as tests targeting an "interplay of multiple modules".
Now we'll take a look at how we can make use of the JUnit syntax for integration tests:
- First off, the naming is confusing: We use the JUnit syntax, but not for unit testing.
- The gist is, we'll be using the known annotation syntax, but target non-unitary tests.
Maven configuration
A first consideration is that unit tests and integration tests should not occur in the same phase.
| Test type | Maven phase |
|---|---|
| Unit tests | test (Phase 3) |
| Integration tests | verify (Phase 5) |
- That means, if we use the same testing syntax we need to find a way to tell maven how some of our tests class shall be
invoked in the
testphase, while others shall be invoked in theverifyphase. - A low-profile way of doing this, is by using a prefix or suffix, to indicate integration tests.
- Example:
- Test classes ending on
IT(suffix) are considered Integration Tests, and will be reserved for theverifyphase, e.g.AutomatedGameSessionsIT.java. - Test classes ending on
Test(suffix) are considered regular unit tests, and will be invoked in thetestphase.
- Test classes ending on
Stick with the conventions
The above suffixes are widespread conventions. The Maven plugin for unit testing (Surefire) will actually by default only search for and invoke test classes if the class name ends on Test.
Maven configuration for integration tests
Basic JUnit tests do not require a maven plugin. However, as soon as we want to customize how our testclasses are executed, we can make use of the Surefire plugin, which allows for more advanced test configurations.
The below configuration excludes any test classes ending on *IT.java from the standard mvn test phase, and then
defines a second category of tests (matching the previously excluded files) for the verify phase.
<!-- Plugin to associate files ending with IT to integration test phase (verify) and all other test to test phase (test)-->
<plugin>
    <groupId>org.apache.maven.plugins</groupId>
    <artifactId>maven-surefire-plugin</artifactId>
    <version>3.5.2</version>
    <!-- exclude all files ending on *IT from the standard unit test phase -->
    <configuration>
        <excludes>
            <exclude>**/*IT.java</exclude>
        </excludes>
    </configuration>
    <!-- define an extra test run, containing exactly the files we previously excluded -->
    <executions>
        <execution>
            <id>integration-test</id>
            <goals>
                <goal>test</goal>
            </goals>
            <!-- associate with the maven verify phase -->
            <phase>integration-test</phase>
            <configuration>
                <excludes>
                    <exclude>none</exclude>
                </excludes>
                <includes>
                    <include>**/*IT.java</include>
                </includes>
            </configuration>
        </execution>
    </executions>
</plugin>
Configuration credit: StackOverflow
Integration tests for blackboard architectures
Configuring when a test class is invoked is not sufficient. We still need to code actual integration tests!
In this course you've been working with balckboard-style architectures. In the context of MVC, this means:
- The view cannot just ask the controller to make any arbitrary move.
- Instead, the controller first provides a list of options (expert on the blackboard), and the view then interacts with the human player to determine which option is selected - and subsequently performed by the controller.
We can imagine this interplay like a tennis match:
- The controller provides some options (passing the ball)
- The view, by interacting with a human returns a choice (returning the ball)
What makes out match slow is the human interaction. However, if we found a way to strip the interaction, we would instantly have an integration tests (covering the interplay of multiple system components.)
Integration tests for Blackboard
In the context of blackboard, any decision-making algorithm can be turned into an integration test. For games, multiple strategies can be combined, to create larger test scenarios.
We'll now take a look at two (primitive) decision-making strategies:
Keksli
Keksli is a charm, but profoundly opportunistic. When offered multiple options (e.g. multiple human servants offering food), he'll simply go for the closest.

How can we translate Keksli into a decision-making algorithm ?
When a controller offers multiple options, we instantly chose the first, and pass it back to the controller for execution. We can replace all human-player decisions by instances of Keksli and test our game. The session will not represent a very intelligently played game though.
Determinism is essential!
Going for "the first" option may be non-deterministic. E.g. if the blackboard options offered by the controller are in random order, Keksli's choices are not deterministic, i.e. the integration tests is not deterministic either. Always sort the blackboard options before selecting the first element.
Mad Max
Mad Max is Keksli's fierce antagonist. Mad Max has no plan and simply selects a random action among the offered options.

How can we translate Mad Max into a decision-making algorithm ?
Similiar to Keksli, but instead of selecting the first option, we use a PRNG (Pseudo Random Number Generator) to select
a valid random option on every iteration. We use a simple Math.abs and Modolu to ensure the random number is in
range.
If Mad Max choses randomly, should we still sort our options?
Yes! We want our MadMax decision-maker to be independent of the controller implementation, i.e. it should be deterministic and lead to the same outcome, no matter in which order blackboard options are originally presented. MadMax is not truly random, the implementation uses a PRNG. An initial sort is a reliable means to obtain deterministic integration tests!
Mocking
Often times, just getting to the point where you can begin testing is non-trivial. This is notably the case when working with internal and external resources:
- A database => You can only test when the DB is online
- The filesystem => You can only test if certain files are on disk
- An online service => ou can only test if a certain service is online and accessible
- ...
---
title: SUT needs a DataBase object
---
classDiagram
    SUT *--> Database: has a

    class Database {
        <<Class>>
        +writeToDB() void
        +readFromDB() String
    }

    class SUT {
        <<Class>>
        +SUT_Constructor(DataBase) SUT
        +doSomethingThatNeedsRepositoryRead() String
        +doSomethingThatNeedsRepositoryWrite() void
    }
Interpretation: SUT needs access to a DB. We cannot test the SUT, without a fully functional DB connection.
Mocks replace actual SUT dependencies
When your SUT depends on complex dependencies, it is common practice to replace these dependencies by a substitute. These "Mock" classes imitate the original dependency's behaviour but are easier to control and greatly facilitate testing.
Oldschool Mocking
In principle, you do not need any additional tool for mock testing. A simple interface with a production and a Mock implementation is enough:
---
title: SUT needs any Database implementation
---
classDiagram
    Database <|-- ActualDatabase: implements
    Database <|-- MockDatabase: implements
    SUT *--> Database: has a

    class Database {
        <<interface>>
        +writeToDB() void
        +readFromDB() String
    }

    class ActualDatabase {
        <<Class>>
        +writeToDB() void
        +readFromDB() String
    }

    class MockDatabase {
        <<Class>>
        +writeToDB() void
        +readFromDB() String
    }

    class SUT {
        <<Class>>
        +SUT_Constructor(Repository) SUT
        +doSomethingThatNeedsRepositoryRead() String
        +doSomethingThatNeedsRepositoryWrite() void
    }
Interpretation: The SUT has two methods we want to test:
doSomething...(). Both internally issue calls to the Repository. However,Repositoryis an interface, and we can pass a Mock class to the SUT constructor when testing.
Mockito
In essence, all Mocking frameworks envision the above scenario, i.e. replacing complex dependencies by Mock implementations, to facilitate testing.
However, there are good reasons to prefer a mocking framework over manual preparations:
- Converting existing classes to interfaces, along with the setup up additional, dedicated Mock classes is a boilerplate activity and time-consuming.
- In certain cases it is not possible, or not trivial to introduce interfaces for test dependencies, e.g. if you do not have full control over the source code.
Mocking frameworks are about convenience
Strictly speaking, you do not need mocking frameworks. All their functionality can be replicated with manual code constructs. However, they are designed to make mock testing as convenient and minimal as possible. With modern mocking frameworks you can substitute complex dependencies with only minimal configurations.
In the following we'll take a closer look at the syntax of the Mockito mocking framework.
Maven configuration
Before we can access any new linguistic features to make our mocking life easier, we need to let our build system know about the Mockito dependency:
<!-- Mockito dependency, to gain access to additional annotations and testing mechanisms-->
<dependency>
    <groupId>org.mockito</groupId>
    <artifactId>mockito-core</artifactId>
    <version>5.16.1</version>
    <scope>test</scope>
</dependency>
Creating a Mock
We'll stick to the introductory example, but we'll make it a bit more concrete. Let's imagine we have a StudentPrinter
class (SUT), and for basic visual tasks (e.g. listing all students) the StudentPrinter needs access to
a StudentDatabase.
---
title: SUT needs a DataBase object
---
classDiagram
    StudentPrinter *--> StudentDatabase: has a

    class StudentDatabase {
        <<Class>>
        +writeToDB() void
        +readFromDB() String
    }

    class StudentPrinter {
        <<Class>>
        +StudentPrinter(StudentDatabase) StudentPrinter
        +getAllStudentsFormatted() String
        +getAllStudentsWithPrefixFormatted(Char) String
    }
Reminder: We are not interested in testing the
StudentDatabase, we only want to test theStudentPrinters methods. This is why it is legit to substitute theStudentDatabaseclass by a mock, while testing theStudentPrinter.
In our SUT test class, we no longer need to instantiate a StudentDatabase object. We use an annotation instead to let
Mockito know we need a mock class.
- Old code:
- New code:
Annotations are not automatically scanned
Mockito annotations are an extension to the standard java syntax and use reflection (an advanced Java concept). Without going details, for any Mockito annotations to work we must once power up the annotation scan. This is commonly done in the @Before method: MockitoAnnotations.openMocks(this);
Using a Mock
So far we've only created the Mock. However, our SUT is not yet created.
We have two options:
- Without annotation, manually create SUT in
@Beforemethod: - With annotation, having Mockity create the SUT:
What's a Mock, again ?
A Mock is a class that pretends to be something else. It offers the same methods, with the same signatures. However, by default it does absolutely nothing. All return values are null and no internal functionality is ever triggered by a function call.
Testing with a Mock
Since the Mock replaces the original implementation we no longer need an actual database connection, server reply, file-system state etc...
Mocks still need some configuration!
All Mock calls by default return null. That means, we cannot test something meaningful right away! Using the result of any call to a Mock will result in a NullPointerException.
- However, Mocks can be "told" to return specific values for specific inputs.
- To do so we'll use a
when-thenReturnsyntax. - Example:
// When someone asks the mock to get all students, return an Array with three mock names.
when(studentDatabase.getAllStudents()).thenReturn(new String[] {"Roman", "Maram", "Quentin"});

// When someone asks the mock to get all students starting with an `M`, return another Array with mock names.
when(studentDatabase.getAllStudentsStartingWith('M')).thenReturn(
        new String[] {"Max", "Maram", "Mohamed"});
What's the mock result for studentDatabase.getAllStudentsStartingWith(X) ?
The when-thenReturn syntax is input specific. We have not configured what to return for the input X, therefore the Mock object will return null.
Captors
At times, we're not interested in using what comes back from a Mock, but in inspecting what the SUT passes to a Mock.
- Mockito offers a special annotation to "capture" parameters as they are sent to a Mock.
- We can also
verifythat the Captor has been triggered, i.e. the Mock has been called. - Additionally, we can inspect and assert concrete parameter values with standard JUnit
assertstatements.
Example:
// Define a Captor:
@Captor
private ArgumentCaptor<Character> characterCaptor; // Captures String arguments

//... Later, an actual junit tests that uses the captor:
@Test
public void spyOnCallParametersTest() {
  // Finally we can spy on the previous method calls, to verify if parameters have been
  // correctly passed to the object we spy on (by the SUT)
  studentPrinter.getAllStudentsWithPrefixFormatted('A');
  verify(studentDatabase).getAllStudentsStartingWith(characterCaptor.capture());
  assertEquals(Character.valueOf('A'), characterCaptor.getValue());
}
Spies
Finally, there's the situation where you want to use the power of Mockito, but on actual objects, not Mocks.
What does that mean ?
- We do not replace a dependency (e.g. to a Database) by a Mock.
- However, we override the behaviour for specific inputs on specific method calls, using the
when-thenReturnsyntax. - Additionally, we may want to inspect parameters passed to the mock, using
Captors.
The only difference is the annotation we use for our dependency. Since we're using the original dependency, but spy on
its behaviour, we use the @Spy annotation.
Example:
/* In this more advanced example we use the Spy annotation. That is we use the original
 * dependency, but spy on its behaviour using verify, and only override very specific usage
 * scenarios with the `when`-`thenReturn` syntax.
 */
@Spy
private StudentDatabase studentDatabase = new StudentDatabase();
Literature
Inspiration and further reads for the curious minds:
- Piotr Kubowicz: Mutation Testing - Too good to be true ?
- Tomek Dubikowski: Zombies VS Mutants
- PIT (pitest): Mutation testing basics
- Vogella: Mockito Tutorial
- Martin Fowler: Modern Mocking Tools
- Baeldung: Mockito Article Series